Updated: 14 Oct 2025
The Storm C 4 compiler was released by Haage & Partner in 1995-2003. The last version of Storm C was version 4 which you can still buy from Alinea Computers.
You can get Storm C v3 from the Amiga Developer CD v2.1 in the Contributions section. New Storm Wizard is available on Amiforce. Updates are available on Aminet.
See Github for newer toolchain versions of GNU C.
The StormC Editor v5 is now available from Alinea Computers.
Storm C 4 CD
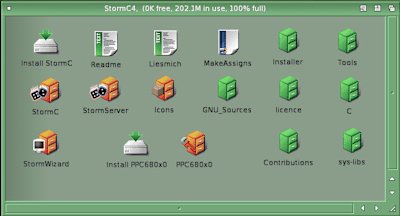
Insert the disk and run Install StormC and follow the prompts to install the compiler, libraries and header files onto the hard disk.
For English versions of the German AmigaGuide manuals, download them from my Project page.
An Storm C installation contains a number of directories and assigns needed for it to run.
StormC - Main Storm C directory containing programs, libraries, headers, guides and examples.
StormWizard - Contains Storm Wizard tool
StormCPP - The Storm C Editor and Compiler
StormDOC - Collaborative documentation tool
Storm Librarian - Creates libraries from one or more object files
StormLink - Linker
Storm Run - Storm C Debugger
Run Storm Server - Runs StormShellServer (needs nipc.library from Envoy) for sharing projects in a team. Not required for normal use.
Break Storm Server - Stops Storm Server
StormWizard - Creates Amiga GUIs and saves as IFF file e.g. wintest.wizard, wintest.h, wintest.cd
as_68k - New style gnu 68k assembler.
FD2Pragma - Create pragma headers from FD files.
gasp - Assembler pre-processor
PowerASM - PowerPC assembler
PhxAss - 68k Macro Assembler
(supports legacy asm files).
Run the StormCPP program and you will get the following toolbar:
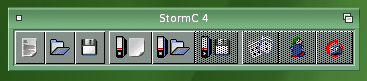
Toolbar icons:
F1 = Open a new editor window
F2 = Load text in new editor window
F3 = Save activated text
F4 = Open new project window
F5 = Open project from file
F6 = Save activated project
F7 = Make project
F8 = Run program
F9 = Debug program
a. To begin, click on the fourth icon or press F4 to create a new project. If opening an existing project press the fifth icon or pess F5 to open a project.
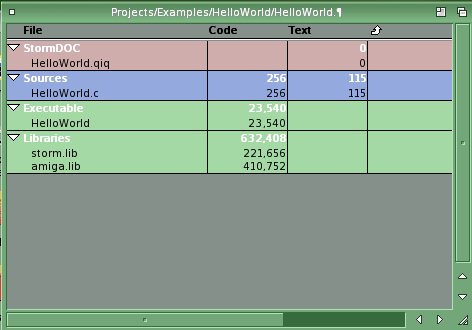
b. A type project may look this this. It will list source files, object files, documents and programs (executables). Existing source, header, docs, libraries can be added via the Project menu, new entries can be added via New editor window icon (F1) on the tool bar.
b. You can create a new source file by pressing F1 or select the first option on the toolbar. To open existing files, double click the source file in the project.
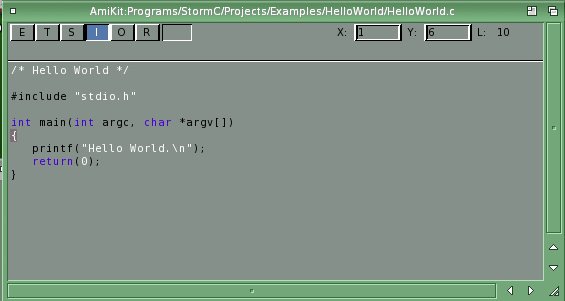
The buttons at the top left enable/disable the following:
E = Show end of lines (¶)
T = Show tabulators(*)
S = Show spaces (.)
I = Indent new lines
O = Overwrite text
R = Make text read only
[ ] = Show 'M' if text is modified
c. Use the options on the Compile menu to compile and build your source and projects.
d. Project settings can be found by selecting the project window and select the Settings menu.
e. When done save any source files via File menu then save the project (F6) on the toolbar.
c. Click on Make to compile and link your project. It is possible to compile (F4) or build (R-Amiga-B) your project from within the editor.
Conversion notes from SAS/C
1. Use the correct and latest headers from. NDK 3.2 or later where possible and use the proto headers files. plus any libraries such as ixemul.library.
2. Always make sure function main() returns an integer. Don't use void.
3. Casting of variables or values is important. Use of NULL can cause casting errors, use 0 (zero) instead.
4. Use ANSI C or AmigaOS function calls where possible, avoid old compiler specific calls.