 |
Amiga Emulator FAQ |
Workbench 1.3 Preferences
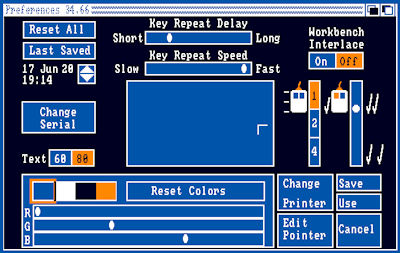
- Preferences
- Key Repeat Delay
- Sets the time between first key press and when the same key is repeated.
- Key Repeat Speed
- Sets how fast the character is repeated.
- Workbench Interlace
- Changes the screen resolution by doubling the viewing area. In Interlaced mode, for NTSC, it increases from 200 to 400 lines, and
PAL from 256 to 512 lines. It also displays the odd and even numbered lines seperately.
- Screen centering
- Move the pointer in the central box to change the position of the Workbench window in relation to the screen for centering for instance.
- Mouse speed
- You can change how fast the mouse point moves by 1x, 2x or 4x the speed.
- Double click speed
- You can change how much time needed between clicks to detect a double clock.
- Colours.
- Workbench is displayed using 4 colours: Blue, White, Black and Orange. Use the colour boxes and the Red, Green, Blue sliders
to change the colours in Workbench to suit you. Use 'Reset Colors' to change back to defaults.
- Change Serial
- Opens the seperate Serial communications preferences.
- Text
- Sets the number of columns for text to either 60 or 80 characters across the screen.
- Change Printer
- Opens the seperate Printer device preferences.
- Edit Pointer
- Opens the seperate Pointer graphics preferences.
- Save
- Saves any changes to memory and to disk.
- Use
- Save any changes to memory only. They are lost if the computer is powered off or restarted.
- Cancel
- Ignore any changes and use last saved changed.
- Serial
- Baud rate.
- Set the number of symbols or modulation rate per second sent over a serial connection.
- Read Bits.
- Data is read in bytes (8 x 1s or 0s), you can set the number of bits used for data.
- Stop Bits.
- Number of bits to indicate then end of data (stop data).
- Handshaking.
- The methods of how different computers communicate together.
- Buffer Size.
- The amount of memory to temporarily store data while is is being transmitted or received over serial connection.
- Write Bits
- Data is read in bytes (8 x 1s or 0s), you can set the number of bits used for data.
- Parity
- How data is verified by using parity checks which can be Even, Odd or None.
- OK
- Cancel
- Printer
- Connection type
- Printer can be connected via parallel port or serial port.
- Printer name
- Select a printer driver from list. Generic is text only and there other available on the Extras disks in Devs/Printers.
Copy any required printer drivers from Extras to Devs/Printers on your Workbench disk using the InstallPrinter tool .
- Custom Printer Name.
- Set you custom printer name here.
- Paper size
- Select the standard paper size you require which determine the width and length of the paper.
- Length
- Set the number of lines per sheet of paper.
- Paper type
- Quality
- Sets the quality of printed output, draft will be faster, useful for just test and Letter for slower high quality output.
- Pitch
- Sets the size in point size of the text in dots per inch.
- Spacing
- Sets how many lines per inch on each page of paper.
- Graphic 1
- Threshold
- Sets the threshold between light and dark colours for graphic output.
- Aspect
- Sets whether print is sent horizontally (landscape) or vertically (portrait).
- Shade
- Sets type of colour or not is used: Black and White, Grayscale 1 or 2 or Color mode.
- Image
- Sets the image or normal positive or reverse colours (negative).
- Graphic 2
- Smoothing
- Enabled smoother output to improve sharpness of the image.
- Color Correct
- Change Red Green Blue colours to increase or decrease the number of colours available.
- Width limit.
- Set limits of width of paper in inches.
- Height limit
- Set limits of height of paper in inches.
- Left offset
- Set spacing on left side on inches
- Center
- Enables centering of the image
- Dithering
- Selects type of dithering used between pixels: Ordered, Half-Time or Floyd-Steinberg (F-S).
- Limits
- Set the kind of limit setting to use: Ignore, bounded, absolute, pixels or multiply.
- Density
- Sets the amount of Dots Per Inch (DPI) for the image to improve resolution.
- Scaling
- Set the scaling of the image by Fraction or Integer type.
- Pointer
- Pointer image
- You can change the shape of the pointer by setting or clearing pixels
- Colours.
- You can set the colours used for pointer using Red, Green, Blue sliders.
- Restore.
- Restore pointer image back to last saved image.
- Clear
- Clears the entire pointer image.
- Reset Color
- Restores colour setting back to default.
- Set Point.
- Allows you to set the click pointer location indicated by small orange squire (usually top left of image).