
| |
Amiga Emulator FAQ |
Updated: 24 September 2025
Chipset type: You can select which custom chipset to use:
OCS is the Original Chipset used in the A500, A1000 and 2000.
OCS Agnus is the chip supporting 512KB Chip RAM.
OCS Denise is the graphics chipsupporting PAL or NTSC node, interhacing, planor bitmaps, 32 colours and 4096 HAM mode.
ECS (Agnus,
Denise, Full) is the Enhanced Chipset used in the A600, A3000.
ESC Agnus is the chip supported 1MB or 2 MB Chip RAM.
ESC Denise is the graphics chip which supports Productivity VGA mode, and SuperHiRes modes.
AGA is the Advanced Graphics Architecture used in the A1200, CD32 and A4000 modems. It supports 256 colours out of 16m palette, and
262,144 colours in HAM-8 mode. smoother scrolling, fast memory page fetches
and wider sprites.
The screen mode will default to PAL
(640 x 256) or you can use NTSC (640x200) screen resolution.
Misc options: You can specify where to enable Immediate Blitter for faster
graphics or Faster RTG to turn off chipset features if using Picasso96
screens or even Cycle exact CPU and Blitter to adjust between CPU and
Blitter performance and Genlock connected if using Genlock features for
video work.
Collision levels for games:
None: No collision detection enabled.
Sprites: Enable collision detection between hardware sprites (not sure this
includes Bobs).
Sprites vs Playfield: Enable collision detection between sprites and background
graphics.
Full: Enable all collision detection for everything.
You can emulare all four floppy drives named DF0: to DF3: (Disk Floppy number).
If you do not want to write to the disks, enable the
Write-protected flag.
Also you can
configure the floppy drive speed to load faster, slow or more compatible speeds.
You can create blank floppy disk images using the filesystem of choice: OFS (Orginal FileSystem), FFS (Fast FileSystem) or Custom format and with optional boot block, to allow you to boot from them.
Finally on the Sound tab you can also emulate the sound of the floppy disks including loading and the drive disk check sound.
Winuae allows you to emulate the CD-ROM drive and Hard disk drives. The early A500 and A1000, A2000 supported SCSI drives and custom built drives. The new A600, A1200, A4000 supported the more popular IDE ATAPI drives in 2.5" or 3.5" sizes.
Filesystems supported include OFS (Original File System) with Workbench 1.0 to 1.2, the FFS (Fast File System) was introducted with Workbench 1.3 which improved disk performance, the disk space used is stored as a 'bitmap', it removed redundancy data and includes data-valifator to 'repair' corruption in case of a crash or failure. Limitations include 32-bit address restrictions limitaing drives to 4GB. Workbench 3.5 and later removed this restriction. Third party file systems can also be emulated including PFS (Professional File System) and SFS (Smart FileSystem).
WinUAE supports Hard files which stores data in a HDF formatted file, a Directory based system using Host's file system, an archive file (gz, zip, 7z, lha) or access a real Amiga formatted hard disk connected to the host. Directory format can be used to access CD or DVD drives instead of using AmigaOS' CD file system, and is used by third party kits like AmiKit.
Any disks require a HD Controller to be specified such as IDE, SCSI, or an Accelerator card with a HD controller and they will need a rom file to work.
You can mount your host drives (C: , D: etc) at start so you can access your host's file directory, any removable drives (USB), network drives, CD/DVD drives and Tape drives (used by Amiga Unix system called AMIX).
Amiga Mouse Port 0: This
defaults to the Windows Mouse to emulate the Amiga mouse.
Amiga Mouse Port 1: This defaults to the keyboard, if you have a Joystick or Joypad installed, you can switch it to your favourite Game Controller if a driver is installed on the PC. Other options include Keyboard layouts A,B,C, X-Arcade modes or mouse.
For Keyboard, use Num keypad cursor keys (4,8,6,2) and 0 to fire.
Language:
Select the language for Winuae interface (by default this is English).
For other languages create and/or copy a translation DLL to the WinUAE Program folder and it will appear in the list of languages.
You can use a program such as Resedit to create and modify the translation DLL. The DLL will be tied to the version of WinUAE it was created for.
Keyboard LEDs:
Enables Power or Floppy disk LEDs to be shown as keyboard lights on the keyboard
instead to emulate Amigas LEDs.
USB mode: Enable USB keyboard use.
Logging:
Create log file: Allows debugging of programs to record what happens when programs
crash. See Illegal mem access options to record them too.
Load State:
Load a saved state from disk to resume a session saved earlier. Press END +
F5 to restore state
Save State:
You can now save or load a Save State which will save memory to a disk
file (.USS) and reload it later. Ideal for saving the current state of an Amiga
game which does not allow to save itself and so you can restore from that position
later. Press SHIFT + END + F5 to save state
When Active:
Allow Winuae to run at different priorities if Winuae is active for some time.
Default is Above Normal.
When InActive:
Allow Winuae to run at different priorities if Winuae is not active for some
time. Default is Normal.
When Minimised:
Allow Winuae to run at a different priority when you minimise the Winuae window
or screen to use the PC side. Default is Below Normal.
You can Pause emulation and disable any sound when Winuae is not in use to speed up PC side more.
File Associations:
Lists the file extensions of files that are associated with Winuae. This is usually:
uae = Configuration file
adf = Amiga disk format
adz = Compressed amiga disk format
dms = Disk masher format
fdi = Formatted disk image format (used by Disk2FDI)
ipf = Interchangable Preservation format for disks (see SPS)
uss = User save state
Here you can emulate sound to Disabled, Disabled, but Emulated, Enabled and 100% emulated.
Good sound emulation is dependant on fast PC processors,
on the Amiga it is done on the Paula chip independantly of the processor. Normally
the Amiga uses 8 bit mono/stereo sound with 4 voices. You can improve emulation
by adjusting the options on this screen, if you have DirectX, you can use DirectSound
for instance or use WASAPI (Windows Audio Session API) used by Vista or later.
Options include Frequency (11K-48K),Volume, Stereo mode (mono/stereo)
and Sound buffer to allow for smoother sound play back.
Use the Emulated option to emulate Amiga sound, use the 100% accurate if more
sound accuracy is required (see CPU options to allocate more Chipset priority).
In v0.8.14, Sound Buffering and Interpolation is added to improve the quality
of sound playback. If sound pauses or is jittery increase the buffer size.
The Floppy drive sound (as it searches, read or writes to a disk) can also be emulated with volume control.
The Amiga can have upto four floppy drives named DF0 to DF3 (e.g. Disk Floppy
0). You can specify the Disk image you wish to load up in the four slots given,
always start with DF0 as that is the boot drive, the image is usually a ADF
or a ADZ file which can be found and loaded via the ... button to select
the image you require from the hard disk or a floppy drive (A:) and the Eject
is there to emulate ejecting a floppy disk from the Amiga.
If no image is selected or the disk image is not bootable then the insert disk
screen will appear, if that happens press F12 to bring up Floppies again and
you can change disks, this is also helpful when a program requires a disk change.
Press END key and either F1, F2, F3, F4 to do a disk change and using SHIFT+END
and F1-F4 will eject the disk.
The Create Blank Floppy button will create a blank 880K ADF, useful to
store data or save games onto. Some games will require smaller 830Kb OFS disks
to save games (to do this turn off the FFS button in the Format options in Workbench).
NB: You must format the disk before it can be used to save onto. Some
games require special formatted disks to save onto, see FAQ page for link for
Save Disk Images.
From v0.8.14, you can now disable the other floppy drives DF1-DF3 to save memory
for those old games that require every extra byte. Also, you can speed up floppy
access upto 8 times as fast. You can now Create Custom Floppy for in-game
saves.
To improve speed of reading from floppy disks then you may set the Floppy
speed to improve performance.
If you have AmigaForever installed, you can find adfs in the C:\Users\Public\Documents\Amiga Files\WinUAE\adf folder on your hard disk, and if you have the AF CD, you can find adfs in the AmigaFiles\Shared\adf folder.
This allows you to emulate a hard drive for the Amiga. There are three distinct
types:
a) Directory. This just uses a PC directory structure to store the Amiga files.
The advantage is that you can copy files to/from the PC and Amiga sides at will.
So you can copy archives directly into the a directory to be unarchived from
the Amiga side and so on. The Disadvantage is that it can take more disk space
up (esp. if you have large cluster sizes), and you cannot use File Comments
or some Protection Flags (e.g. Script, Pure). Just create a new directory
and specify the path to that directory for your virtual Amiga hard disk.
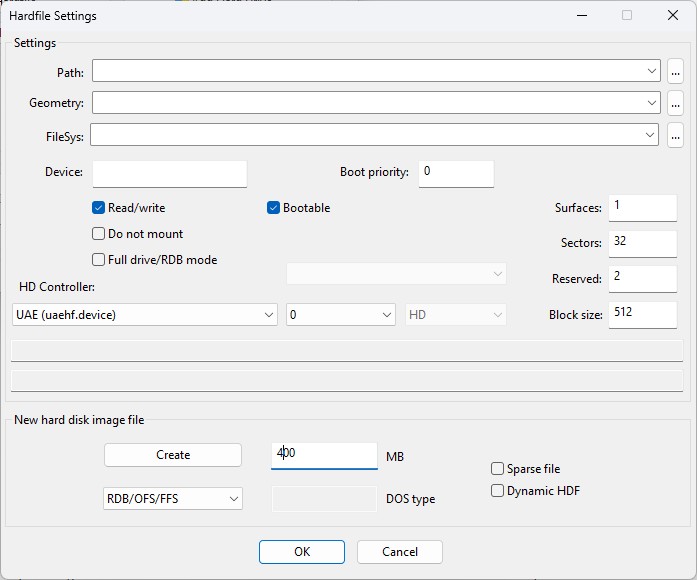
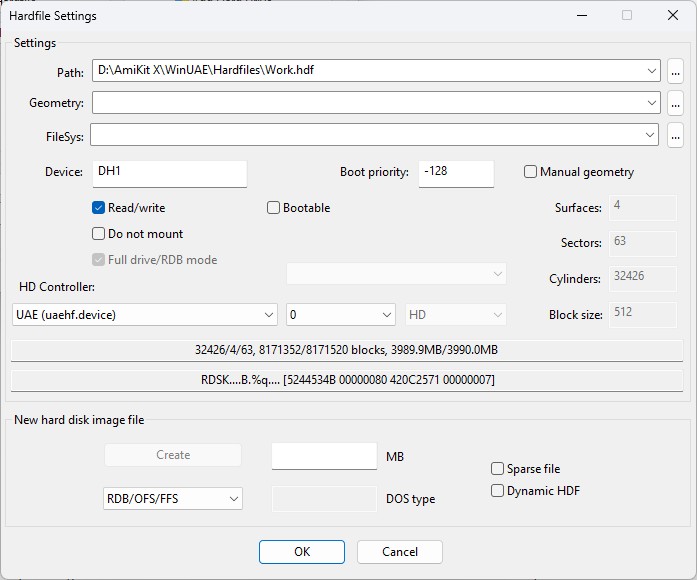
b) Hard File. This is just one big file which emulates Amiga hard disks better
with all the features of Amiga HardDisks and probably won't take as much space
as Directory HDs. Disadvantages are that you cannot easily expand hard files
and you cannot access them from the PC side. To create a hardfile, select Add Hardilfe, then specify its size in megabytes e.g. 400 for a 400MB HardFile, then click Create, select a folder and specify a filename for the new HDF file and click Save. To add an existing HDF file, click on the dots for Path, specify a Device name e.g. DH1, set any other options such as Read/Write and Bootable and click ok to add it the virtual machine.
c) Hard Drive. In later versions of Winuae you can add Amiga Formatted hard
drives to your PC and select the disk from
within Winuae to be able to read the contents of it from the emulator. You will
need Microsoft Windows and Admin rights to use this feature!
You are not restricted to using one Hard disk but you have as many as you require
and mix types so that you can use a Directory HD just to swap files between
UAE and the PC and use a Hard File to boot and run Amiga disks from.
You can Remove HardDrives from here and view the Properties of Hard Drives as
well. You can also access Amiga CD ROM disks by specifying the drive letter
of the drive on the PC e.g. D: or E: (without the slash) as a Directory HD and
Read only. Alternatively, tick Add PC drives at startup, to allow access
to PC disks such PC volumes and Zip disks when starting Winuae. (Use uaescsi.device
for CDROMs).
Please note: Always backup your hard files in case of deletion or corruption
(get a copy of DiskSalv or other utility to fix FFS disk problems).
It is possible to mount a Hardfile to a real Amiga using a tool such as ImageMount from Aminet.
From Winuae 2.3.0 you can also mount CD disk drive or images in cue, ccd, mds or iso formats.
Here you can configure keyboard and joystick keys or movement to whatever you
want. It has a 'Compatibility mode' and four custom configurations where you
can change what keys or joystick positions you want mapped to for things such
as CD32 joypads which have multiple buttons that you may want to map to buttons
on your PC joystick and keyboard to suite your tests.
You can also adjust settings such as Joystick dead zone, Autofire rate, Digital/Analog
joymouse speed, Mouse speed and so on.
Most of your keyboard retains its regular functionality under UAE, but there are a few notable exceptions:
Replacements for an Amiga
| Configuration A | Configuration B | Configuration C | |
| Up | Keypad 8 | Cursor up | T |
| Down | Keypad 2 | Cursor down | B |
| Left | Keypad 4 | Cursor left | F |
| Right | Keypad 6 | Cursor right | H |
| Fire | Keypad 0 | Right Control | Left ALT |
CD32 Joypad Emulation
| / | Rewind |
| * | Play |
| - | Fast Forward |
| 7 | Green |
| 9 | Yellow |
| 1 | Red |
| 3 | Blue |
On this tab, you may specify the location of Kickstart ROMs, Configuration setting files, saved Screenshots (from Output), saved State files, Video path and Saved Image paths.
This screen is useful to use pre-set Amiga configurations and load up disk images for quick emulation without having to go through the the rigmorole of set up a complete configuration to play a game etc.
For further information or advanced features of UAE please read the documentation
in the Docs directory that comes with WinUAE or check out the FAQs at
Cloanto's AmigaForever page.
To copy Kickstart from your Amiga or make Disk images, copy the files in Amiga
Programs to a 720K disk or over a serial network if you don't have CrossDos
to your Amiga using Cloanto's Explorer program or something like AmiTrans.
Two sample configurations for A500 and A1200 are provided here:
UAE Configurations.
![]() Back to UAE FAQ.
Back to UAE FAQ.